This recipe is one that I’m kinda sorta maybe really proud of, because it’s freaking DELICIOUS, and also super easy to make. Over my spring break, I first made this for my family to put over baked stuffed shells. The sauce was so tasty that I was using the shells that fell apart mid-boil to dip into the leftover sauce while the final product was baking.* My family also loved the sauce, which was very encouraging since they’re always the first to be honest about how my food actually tastes.
I’ve also noticed that it’s incredibly difficult to find a decent tomato sauce in the grocery store that’s also made without refined sugar. I found a pretty good all-natural pizza sauce once, but in general, none have lived up to my expectations. If you’re anything like me, you would much rather take the time to make something from scratch and be sure that it will turn out exactly how you want it. Thus, this tomato sauce was born. Plus, this is a fairly simple recipe and it makes 6 heaping cups of rich, sweet, flavorful tomato sauce, and probably costs less in total than it would to buy the same amount jarred. My version does contain 2-4 oz. dry red wine, (plus about 4 oz. to drink while cooking 😉 ) but you could easily omit that if you prefer not to cook with alcohol.
I collected inspiration from a few different recipes, but in the end tried to keep the ingredient list as small as possible. This was mostly so that I could have a go-to recipe that was both inexpensive and easy to make. The one recommendation I would make is that you buy crushed tomatoes WITHOUT basil for the sauce. For whatever reason, I just don’t think that tomatoes that have been canned with basil taste as good, and they have sort of a metallic aftertaste to me. Plus, when they’re available, using fresh herbs is always best anyway. The photo above features purple basil, which is the only thing I could find fresh in my grocery store, but it worked just as well. I used canned tomatoes to save time because I’m a college student with things to do (and because San Marzano tomatoes are amazzzzzzing), so if you’re a purist, unfortunately I can’t really help you. Tharry.
28 oz. can crushed San Marzano tomatoes (without basil)
2–4 oz. dry red wine
1/4 cup fresh basil, chopped
salt and pepper, to taste
Instructions
In a medium saucepan, warm the olive oil and garlic on medium heat, distributing the garlic occasionally.
Add the onion and red bell pepper and cover, stirring occasionally until very soft.
Add the red wine and stir. Once wine has cooked off (evaporated), add the crushed tomatoes and basil, and stir. When the mixture starts to bubble, lower heat and let simmer for 10-15 minutes.
Transfer ingredients to a blender (or use an immersion blender) and purée until smooth or at your desired consistency. Add salt and pepper to taste.
I’m back! It feels so nice to return to posting after several weeks of “hiatus” and a few days of remodeling the site. Although I’ve stayed up-to-date on social media, I know I’ve been completely neglecting my blog, and that makes me sad. Especially since I keep excitedly hashtagging “#ontheblog soon” on Instagram, and then not actually following through. Isn’t that abysmal? Maybe you’ll forgive me, since preparing for graduate auditions, practicing for my senior recital, and attempting to play violin in general have taken up all of my time over the past few months. Which is weird, since I still can’t play violin. I’ll keep trying though, and maybe one day I’ll understand how this thing I’ve been doing for 17 years actually works. Maybe. I did start a practice journal, which for the past…. three days (haha) has proven itself to be pretty efficient so far. Planning out my weekly/daily practice goals and logging my progress has already helped me to approach my music from a fresh angle. Yesterday didn’t go as well, but I kind of sealed my fate when I attempted to practice solo rep after playing orchestra music for five hours. (Stupid…)
In other news, I just applied to graduate, which is strange, since I SWEAR I just got to college. Before I know it, I’ll have to be making mundane adult decisions, like whether “eggshell” or “tropical sand” is a better paint color for the cardboard box I’m living in master bedroom. I’m not quite there yet, so over winter break when I wasn’t obsessing over the future, practicing, or resisting the allure of Netflix, I was developing recipes like crazy. Some of the recipes were amazing, and some were… not. I made this granola for family and friends as a holiday gift, so I had several rounds of baking to perfect it. It didn’t really take many tries, since the first round was pretty great, but needless to say, this recipe has joined the ranks as “amazing,” and I will definitely be making my own granola from now on! I always like to make my own foods whenever possible and avoid store bought products, since it’s healthier (and often times, cheaper) to be in control of what goes into your food.
This recipe contains all “real” ingredients, and can be modified to fit your dietary needs/wishes. You can customize granola easily, and I admittedly had a little help from Buzzfeed when I made the first batch. Their article really helped give me a good idea about proportions, but I was able to tweak a couple things here and there until the final product was perfectly crisp, crunchy, nutty, sweet, and crackly. I hope you enjoy this granola as I much as I do (I literally had some in a cup of Chobani while typing this… I can’t stay away)!
Unsweetened dried cranberries (optional after baking)
Instructions
Preheat oven to 300˚F.
In a large bowl, mix oats, chopped pecans, unsweetened coconut, cinnamon, cardamom, and salt.
In a separate bowl, whisk together the maple syrup, vanilla, and egg whites, and then stir into the oat mixture.
Melt your coconut oil, and then add it to the oat mixture after maple/vanilla/egg (this helps to avoid the coconut oil solidifying in the cold egg/the egg cooking in the hot coconut oil).
Once all of your ingredients are together, pour them into a tray that’s lined with parchment paper. Using clean hands or a spatula, spread and flatten the mixture.
Bake for 45 minutes, or until the mixture becomes golden brown at the edges and you start salivating from granola fumes. At that point, I like to break my granola up into little chunks with a spatula, mix, and return it to the oven to continue toasting for a bit, maybe 5-10 minutes, until all of the little bits are golden brown.
Remove from oven, and mix in dried cranberries if desired.
The other day, while browsing Wegmans, I stumbled upon a pumpkin. A beautiful, perfectly shaped, tasty looking pie pumpkin.
Hot.
I knew its destiny was to end up in my kitchen, but I’ve never cooked with a whole pumpkin before. It’s only a squash, so I knew how to prepare it. Mostly, it was the myriad of options I had for using it that left me somewhat clueless. After careful thought, I decided on chili. I’m a huge fan of making chili from scratch because you can adjust the heat and flavors to your exact liking. Also, store-bought seasonings tend to contain a lot of sodium, where you can cut most of the salt out by assembling the seasoning yourself.
Then, I thought of a way to use up the dates that have been sitting around in my pantry. Cornbread. Healthy cornbread. Healthy maple cornbread. Healthy maple date cornbread…. Oh, dang.
For this recipe, I prepared the pumpkin by cleaning it and cutting off the top, then splitting the pumpkin in half lengthwise.I scooped out the seeds and pulp, (Tip: Special grapefruit cutlery [grapefruit spoons and those double-sided knives] are great for scooping out squash pulp!) and then cut the pumpkin into 3/4-1 inch thick wedges. I then scraped off the remainder of the pulpy bits and peeled the skin off of each wedge with a potato peeler.
The great thing about this recipe (besides its deliciousness) is the amount of food it makes – I filled a HUGE tupperware container full of chili, which makes this a great recipe for families and meal-preppers alike. Plus, most of its bulk is from the vegetables and squash, not the meat, making this chili lean, filling, and easily adaptable for vegetarians/vegans.
3 cups chopped kale (Tip: You can buy kale pre-washed and pre-chopped by the bag, making preparation much easier)
1 lb. lean ground turkey
One 15 oz. can red kidney beans, rinsed and drained
One 28 oz. can whole plum tomatoes, mashed or chopped
1 tsp. paprika
1/2 tsp. garlic powder
1/2 tsp. oregano
1/4 tsp thyme
1/4 tsp rosemary
1/8 tsp pumpkin pie spice
cayenne pepper, to taste
salt and pepper, to taste
Instructions
Preheat oven to 425˚F.
Prepare pumpkin by halving, removing seeds and pulp, cutting into wedges, peeling, and then dicing into small chunks.
Arrange the diced pumpkin onto a baking sheet that has been greased with oil spray. Season if desired with salt, pepper, and a bit of pumpkin pie spice. Roast for about 10-15 minutes, or until fork tender.
Finely dice your bell peppers and onions and set aside.
In a large pan, warm your olive oil over medium-low heat and add the minced garlic. Add your diced peppers and onions, stirring occasionally until the vegetables start to become soft and the onions are translucent. Add the roasted pumpkin and kale to the vegetable mixture, and cover.
Once the kale has wilted, remove your vegetable and pumpkin mixture from heat, then transfer to a pot.
In your smaller vegetable pan, mash and brown the ground turkey until it no longer appears pink anywhere, then remove from heat.
Add the turkey, beans, and tomatoes to the pot and keep over low heat. Stir well.
Separately assemble and add your seasoning mixture. I recommend assembling everything but your cayenne/salt and pepper, and adding those last to taste. (Note: Paprika can also contribute a lot of heat depending on what kind you have. If you’re not a “spicy” person, I would recommend starting with less paprika in your mixture just to be safe, and then adding it in small increments to your liking once the seasoning is mixed in with the chili.)
Notes
Garnish with plain greek yogurt and avocado slices. Serve with Maple Date Cornbread (recipe link below).
What does one do with a free evening after all of the day’s obligations have been met? Definitely not go to sleep at a reasonable hour. But a blogging marathon? NOW we’re speaking the same language.
I made these almond butter and jelly bars a few weeks back as an experiment and liked how they turned out, so I served them to all the guests at my teacher’s studio recital. I was going to tweak the crust (it’s a bit chewy and I was going for crumbly) but I got pretty good feedback from the crowd, so I decided to post the recipe now. If I edit it, as always, I will update the changes! Because these bars do not contain any refined sugar or sugar substitutes, they are not overwhelmingly sweet, but with all of the flavors they have going on, you won’t miss the sugar.
Ingredients:
Crust
2 cups oat flour
1/2 cup almond milk (unsweetened vanilla works best)
1/8 cup almond butter
1/4 cup honey
1 egg
1/4 tsp almond extract
“Jelly”
1/2 cup dates, boiled and mashed
2 cups whole strawberries, fresh or frozen, tops removed
6 oz. raspberries, fresh or frozen
6 oz. blueberries, fresh or frozen
1 tbs. honey
1/4 cup chia seeds
3-4 tablespoons almond butter, melted
Method:
Preheat oven to 350˚F. Combine wet ingredients and dry ingredients separately for the crust. Slowly add the dry ingredients to the wet ingredients and knead until combined. Pat dough evenly into a 13’x9′ or similarly sized baking pan (nonstick or greased – I like coconut oil spray for baking) and bake for about 15-20 minutes, or until crust is set. Remove from oven and set aside. While the crust is baking, bring dates covered with about 1 1/2 inches of water to boil in a deep skillet. Boil for about 5 minutes, or until dates are soft. Remove the dates from the water, and mash them into a paste. Heat all the berries together in a pan and cover, until they begin to pop/release juice. Thoroughly mash the berries together with the date paste, and then mix in the honey and chia seeds. Let the mixture sit for a few minutes so that the chia seeds can soak, and then spoon the “jelly” onto your baked crust. Melt the remaining few tablespoons of almond butter in the microwave, and drizzle evenly over the top. Return pan to the oven for another 5-10 minutes, then remove and let cool. For best results, refrigerate before cutting and serving so that the “jelly” has more time to thicken.
Considering my blog is supposed to chronicle my balancing of life as a music major with other things, it’s pretty pathetic that I haven’t found time to post ANY of the recipes I’ve made in the past six weeks. To be fair, everyone falls out of their habits sometimes, and I actually have been going through some tough decision-making processes lately. If you’ve read my post about the five things that my junior year taught me, you know that I’m very hard on myself. That’s why, when the time (which is now) came to decide what I wanted to do about graduate school auditions, I decided to take a year off in order to prepare auditions to the best of my ability. Then, I began to get encouragement from several different teachers whom I respect very much, telling me that my goals are within reach now, and a year off would probably be unnecessary. So, I sit before you today decision-less, but I can’t afford to stay that way for much longer. It’s killing me, but at least now I can curl up with a hot bowl of this here squash soup when the days get rough.
I love this recipe for a few reasons.
1) It’s super easy. A bit time consuming, but low maintenance. And I’m very high maintenance, so consider this a miracle.
2) It has all the usual suspects when it comes to autumnal spices and flavors, and you can make it any time of the year when you’re missing these wonderfully crisp fall days. You can also season it however you want, with as many or as few spices as you wish.
3) A little bit goes a LONG way because it’s very filling and satisfying, so it will last you a while as leftovers. One recipe can also feed a large group of people (at least 8-10, possibly 12)
4) It’s super healthy. But that kind of goes without saying. 😉
5) The soup itself (without the garnishes I added) is vegan, gluten free, and can be oil free.
How can you lose?!
Ingredients:
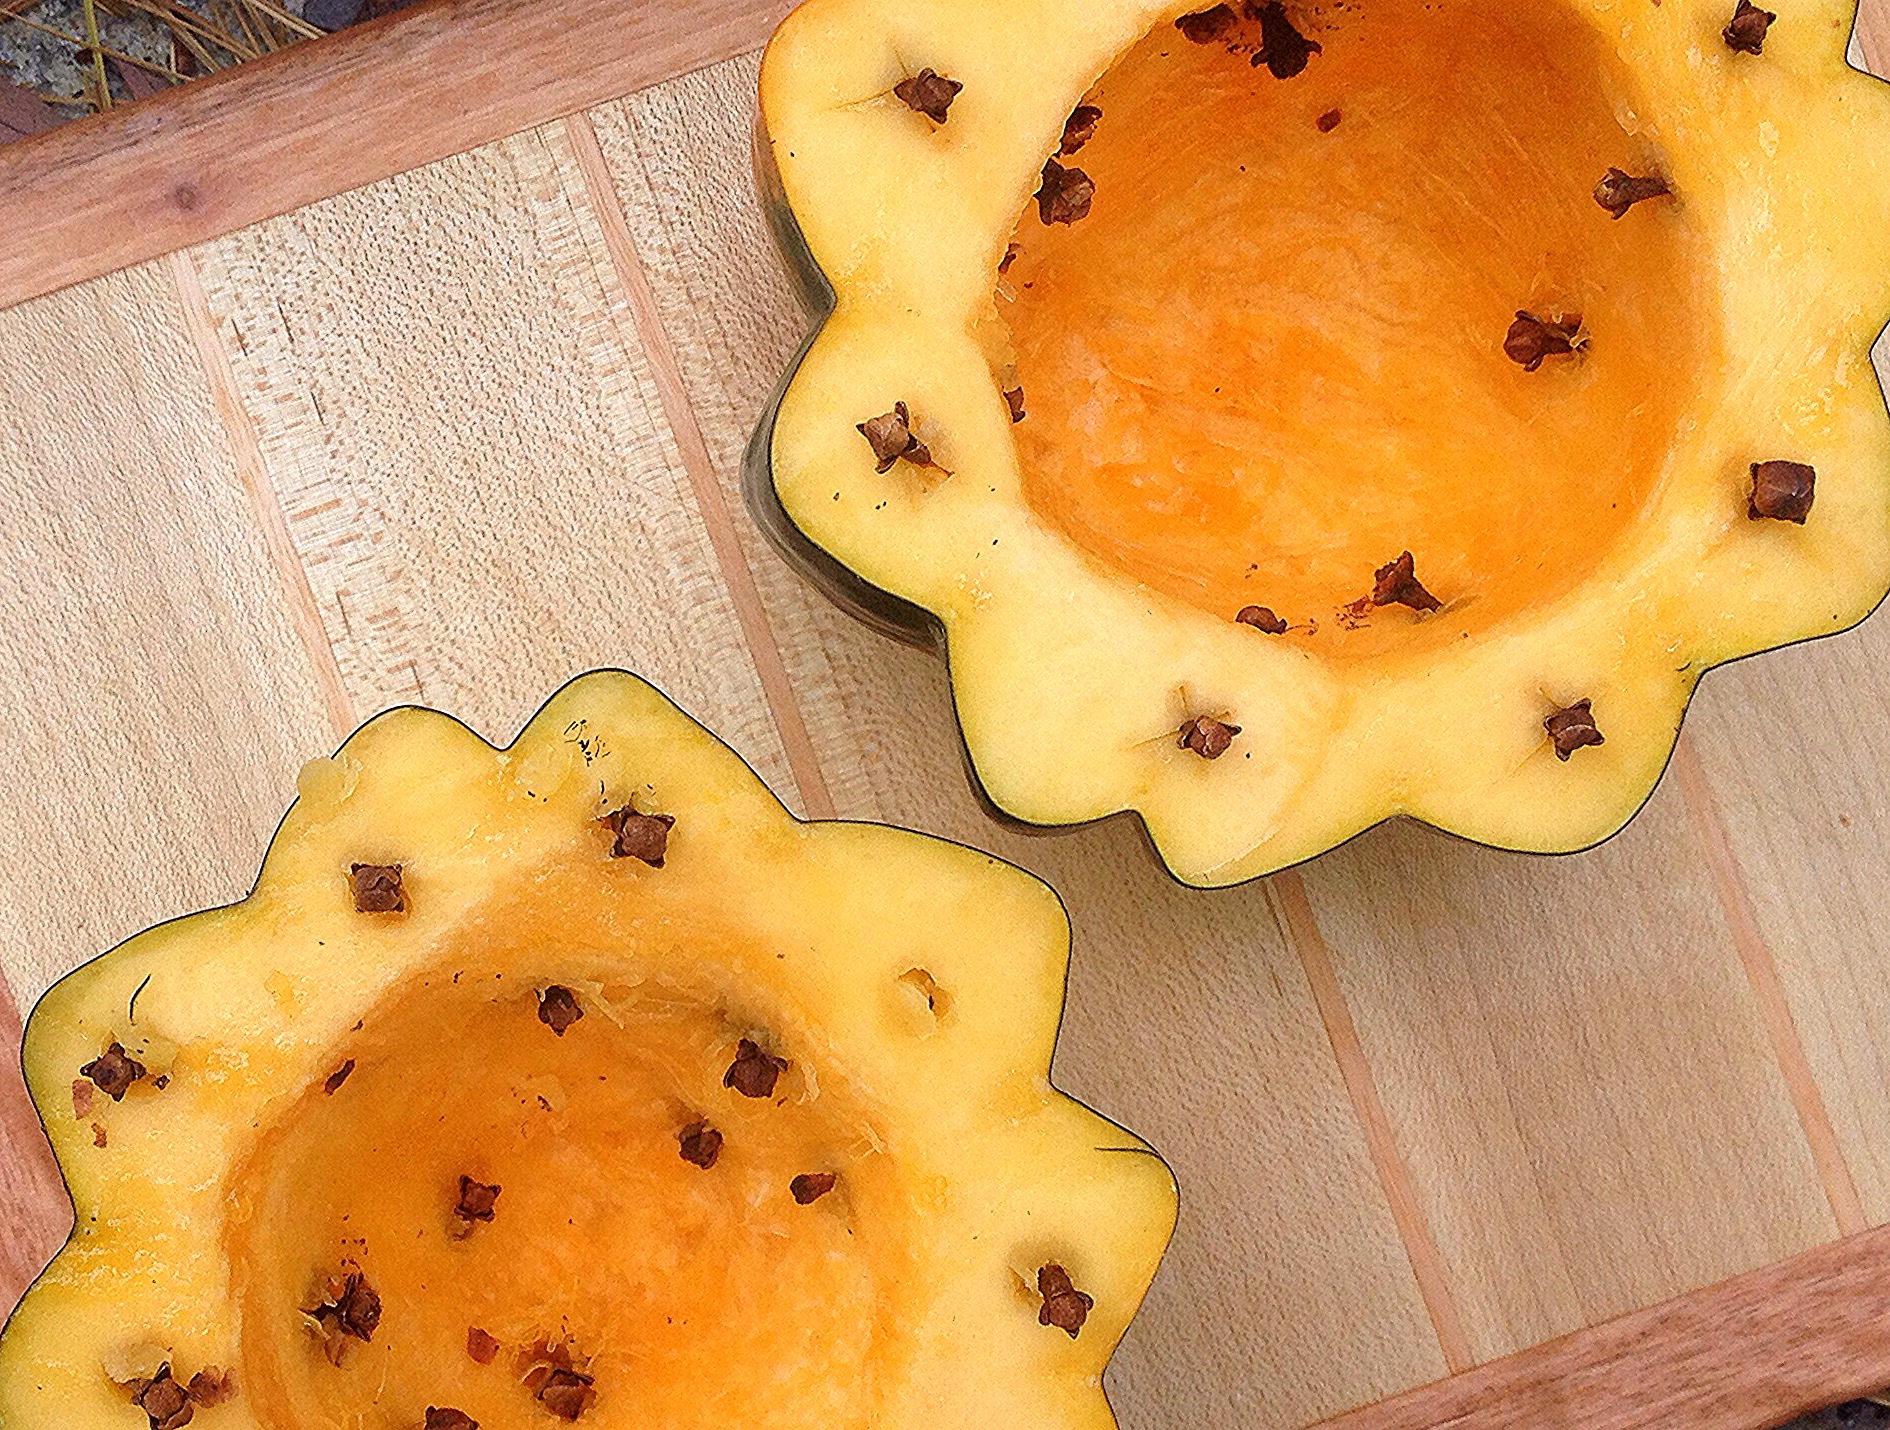
2 medium acorn squash
olive oil
1 tbs. whole cloves
1 cinnamon stick
2 bay leaves
3 cups vegetable stock
1 cup original, unsweetened almond milk
1 tsp. ground cardamom
1/4 tsp. ground coriander
salt and pepper, to taste
Method:
Preheat oven to 425˚F (I put my oven on “convection roast,” if you have that setting). Clean and halve both acorn squash, scooping out the seeds and pulp. Cut the pointy nubs off of each half so that they can sit flat while they’re concave-side-up. Stick cloves into the yellow flesh of the squash, making sure to cover the squash evenly (see pictures below). If you’re having trouble, carefully score X’s into the flesh. Drizzle a little olive oil onto the squash and then flip them face down. Bake for about 20 minutes, then flip squash right side up, and bake for another 10-15 minutes. Remove from oven, and let cool. Once the squash are cool enough to handle, remove the cloves and scoop out the flesh, being careful not to include any bits of skin if possible. In a saucepan, combine the squash flesh, cinnamon stick, bay leaves, and vegetable stock over medium-high heat. Cover, bring to a boil, then reduce heat and let simmer for 10-15 minutes. Remove bay leaves/cinnamon stick. Using an immersion blender, blend the squash and vegetable stock. Pouring the ingredients into a regular blender would work fine as well. Add almond milk, cardamom, coriander, salt, and pepper, then stir to combine. If you’re feeling fancy, garnish with rosemary, homemade croutons, almond milk drizzle, all of the above, or get creative!
Suggestions:
Make this a spicy squash soup by adding a little bit of hot chili sauce (like Sriracha) or red pepper flakes. If adding pepper flakes, do so gradually while blending to control the heat content and keep the soup smooth.
Use a very small amount of pure maple syrup in addition to/instead of olive oil when cooking your squash for a sweeter soup.
Substitute any type of squash if you can’t find or don’t like acorn squash. Butternut squash or pumpkin would work very well in this recipe, and I plan to try this next with a kabocha that I have lying around.